Friday, March 29, 2013

Heat Embossing Practice

I recently decided to try to figure out embossing.  I already had a heat tool (from my experimentation with crayon art) and wanted to put it to use!  I did research online, watched tutorial videos (this one was my favorite), and read through some troubleshooting forums.

With heat embossing, you either need an embossing ink pad OR a pigment ink pad AND embossing powder.  I decided to use pigment ink with my embossing because...
1) it would add some color while using clear embossing powder
2) I could also use it for regular stamping
and 3) I would be able to see where I stamped.

Experimenting with heat embossing was a pain...  Sometimes it would work, sometimes it wouldn't.  Sometimes I would scorch the paper, sometimes I wouldn't heat it enough.  I found out that the thicker the stamp, the better.  If you have a stamp with thin lettering, it may not work the way you want it to.  Here are a few examples of my trial runs:
Thick stamp that DID work.
Thin lettering that DID NOT work.  I also scorched the cardstock here.
---------------------------------------------------------------
I went to Michael's yesterday afternoon to return some paint and ended up buying a stamp and some pigment ink.  I couldn't help myself!  Today I made this card with that stamp, 3 colors of ink, and clear embossing powder.

Here are my supplies:
  •  Stamp ($1.50+tax at Michaels)
  • Ink pads ($1.00/each +tax at Michaels)
  • Clear embossing powder ($1.99+tax at Michaels.  This may have been on clearance!)
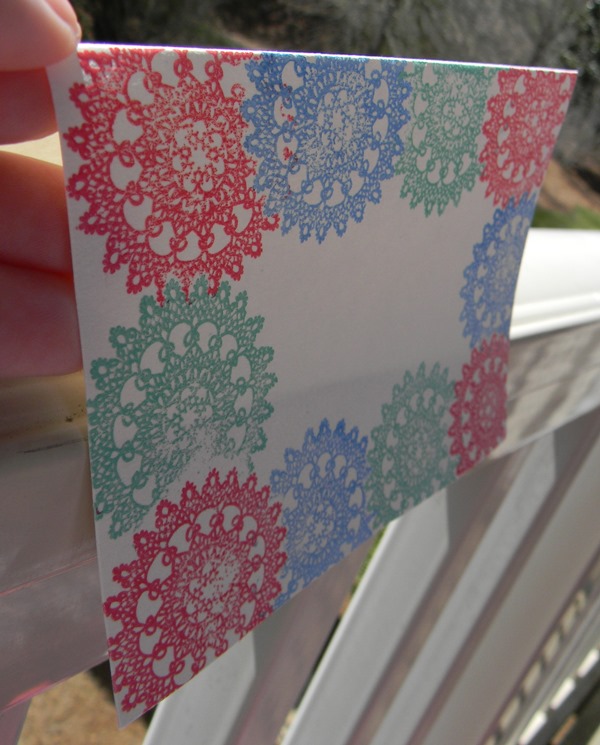
Here are the photos:


It certainly isn't perfect, but I think it looks awesome!

As with most of my cards, I did not write a message on it... yet.  That leaves it open for a thank you card or birthday card and I can decide when the time comes.


Friday, March 22, 2013

Copycat Card

Today's card is modeled directly after a post I saw on Pinterest.  The original blog post can be found here.  According to her blog, she got the idea from this post.  Both are wonderful!

Supplies were few:
 -  Different papers
 -  Ribbon
 -  Card
 -  Rubber Cement (I use that stuff for everything)

I used a "Happy Birthday" sticker but it could have easily been handwritten.

I give this card a 2 out of 10 on the "hardness" scale.  The hardest part was tying the bow!

Tuesday, March 19, 2013

Fun Card


Today was a successful day for card making!

I am very satisfied with how this fun card turned out!


Supplies:
     -  Card
     -  Funky scrapbook paper
     -  Vibrant ribbon
     -  Cute button
     -  Needle and thread


Finished card
After all the supplies were collected, I got to work.  I glued the piece of funky scrapbook paper to the card.  Next, I trimmed the funky paper to fit the card.  Then I played around with different ways to place the ribbon.  I went through a few different scenarios before settling on making an interesting fold with the ribbon.  I first sewed the button in place, then glued the ribbon down so it would keep it's shape.  Trimming the ribbon to match the shape of the card wasn't the easiest task... I haven't been able to master the art of cutting ribbon, so it is rough around the edges.
The button weighs the card down so it will not stand upright.
I purposely did not write a message on the card (yet) so it can be used for any occasion!

Monday, March 18, 2013

Orange Greeting Card

I do not like the color orange.  I never have, and probably never will, like this color.  But for some strange reason, I decided to make an orange card today...

Here's how I did it...


Back at the beginning of March, I was shopping in Home Depot for my dad's birthday gift (I ended up just getting him a giftcard).  I was looking at the paint samples, collecting a few for my crafts (there are so many things you can do with paint samples!).  I found this odd shaped one, and knew I had to have it. 


Here's where the orange comes in... I traced that shape on the a few pieces of orange scrapbook paper.  Then I cut them out.


Next I arranged the shapes together to make a flower.  Pretty cool, huh?


The card I used for this craft reminds me of a doily.  Actually, that gives me an idea for another craft...  I got this card at Michaels, one of my all-time favorite craft stores.  A pack of 8 for $1!  Envelopes included!


Anyway, I glued those cutouts to this card.  Then I cut out around the card.
I added a button to the center
to hide the ugly edges.


Here is the complete card:


I am not in love with this card... Maybe it's because it's mostly orange, or maybe I didn't spend enough time perfecting it.  Either way, I hope as this serves as inspiration for future projects (even if it's what not to do!).  I used glue stick to glue down the papers and Elmer's school glue for the button.  Simple enough.


Tuesday, March 12, 2013

Greeting Card

Using my 1" circle punch, I punched 5 circles. The word "hello" fit!


I added ribbons.  I could have done a better job at cutting the ends of the ribbons but... what's done is done!

I added two silk flowers to the side.  Instead of putting a colorful center on the flowers (glitter glue, sequin, button, etc.), I decided to stay simple and just add a big glob of Elmer's school glue.  It took way over a day to completely dry.  The good thing about most glues is if they're still white, you know they're not completely dry!